Night Photography in Seoul: Best Vantage Points

Seoul transforms into a mesmerizing canvas of lights after dusk, offering an unparalleled spectacle for photographers. The city's blend of ancient palaces, modern skyscrapers, and dynamic urban landscapes truly comes alive under the glow of countless LEDs and neon signs. Whether you're a seasoned photographer or just starting out, capturing Seoul's nocturnal beauty is an unforgettable experience that yields breathtaking results. This guide will lead you to the best vantage points for night photography in Seoul, ensuring you come away with stunning shots that perfectly encapsulate the city's vibrant spirit.
Introduction
Seoul, a sprawling metropolis that never truly sleeps, presents a unique and captivating subject for photographers, especially after sunset. The transition from twilight to the deep hues of night paints the city in a new light, literally. Its modern architecture, juxtaposed with traditional elements, creates a dramatic backdrop that is particularly striking when illuminated. For those passionate about capturing urban landscapes, Seoul night photography offers endless opportunities to experiment with long exposures, vibrant colors, and dynamic compositions. This guide delves into the city's most iconic and hidden gems, perfect for immortalizing its illuminated charm.
For photographers seeking to capture the iconic skyline and bustling energy of Seoul at night, understanding the optimal vantage points is crucial. From elevated observation decks providing sweeping panoramas to riverside parks reflecting the city's glow, each location offers a distinct perspective and photographic challenge, promising a diverse portfolio of urban nightscapes.
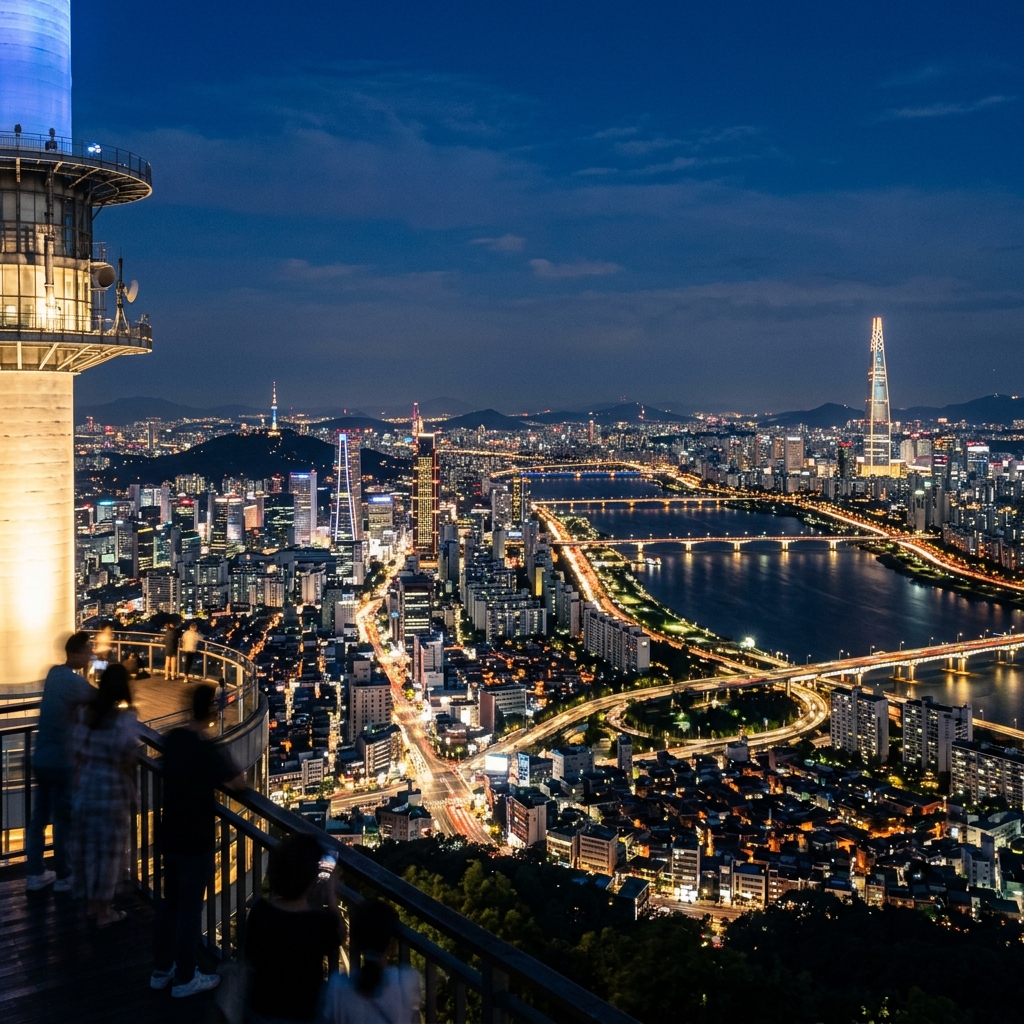
🗼 Icon of the City: N Seoul Tower (Namsan)
Perched majestically atop Namsan Mountain, the N Seoul Tower, affectionately known as Namsan Tower, is undoubtedly one of Seoul's most enduring symbols and a premier spot for Seoul night photography. Offering a 360-degree panoramic view of the sprawling capital, it's the perfect place to start your nocturnal photographic journey. As the sun dips below the horizon, the city lights begin to twinkle, gradually transforming the urban sprawl into a glittering tapestry.
The best vantage points around N Seoul Tower aren't just limited to the observation deck itself. The journey up Namsan Mountain, whether by cable car or bus, also provides fleeting but beautiful views. Once at the base of the tower, explore the various terraces and platforms. The "Locks of Love" area, while popular with couples, can also offer interesting foreground elements for wide-angle shots of the city below. For an unobstructed view, the main observation deck at the top provides floor-to-ceiling windows, allowing you to capture the city's grid stretching to the horizon.
Timing is everything, especially when aiming for that magical "blue hour" shot. This brief period just after sunset, when the sky deepens to a rich blue, perfectly complements the artificial lights of the city. Arriving approximately an hour before sunset allows you to capture the transition from day to night, offering a spectrum of photographic opportunities. For those who enjoy combining breathtaking views with a bit of physical activity, consider exploring the various hiking trails leading up Namsan, offering unique perspectives of the tower and city even before reaching the summit. You can find more about these trails and other scenic spots in Night Hiking in Seoul: Best City Views from Inwangsan and Namsan.
N Seoul Tower Admission Fees (Observatory Only) and Operating Hours (2026):
- Operating Hours:
- Weekdays: 10:00 AM – 10:30 PM
- Weekends & Public Holidays: 10:00 AM – 11:00 PM
- Note: Last admission is 30 minutes before closing, ensuring you have ample time to capture the shifting city lights.
- Admission Fees:
- Adults (13+): ₩21,000 (On-site) / ~₩16,000–₩18,000 (Online)
- Children (3–12) & Seniors (65+): ₩16,000
- Infants (Under 3): Free (1 infant per paying adult)
- Tip: Booking online via platforms like Klook or Trazy often provides a 10–20% discount. It's always advisable to pre-purchase tickets, especially during peak tourist seasons or holidays, to avoid long queues.
To truly capture the grandeur of the Namsan Tower view, consider using a wide-angle lens to encompass the vastness of the city, and a telephoto lens to pick out details of specific districts. A sturdy tripod is indispensable here, allowing for longer exposures that smooth out any motion and enhance the vibrancy of the lights. Don't forget a remote shutter release to minimize camera shake, ensuring crystal-clear images of Seoul's glittering skyline. For unique compositions, look for reflections in the glass of the observation deck or experiment with silhouettes of the tower against the dramatically lit sky.
☁️ Touching the Sky: Lotte World Tower (Seoul Sky)
For a truly breathtaking, sky-high perspective of Seoul's glittering expanse, the Lotte World Tower, home to the Seoul Sky observation deck, is an absolute must-visit. As one of the tallest buildings in the world, its 123rd-floor observation deck offers unparalleled views, allowing you to photograph the city's intricate grid from an astonishing height. The sheer scale of the urban landscape from this vantage point is mesmerizing, with highways resembling luminous veins and countless buildings forming a sprawling, illuminated tapestry.
Capturing the dynamic energy of Seoul from such a height requires careful consideration, especially when dealing with indoor reflections. The glass panels, while providing protection, can often bounce back light from inside the observation deck, obscuring your shot. To combat this, wear dark clothing to minimize your reflection, and position your lens as close to the glass as possible, perhaps even using a rubber lens hood to block stray light. Alternatively, some photographers use a specialized "L-bracket" or even their jacket to create a light-tight seal between the lens and the glass. Patience is key, as you might need to wait for moments when ambient light inside is lower or when there are fewer reflections from other visitors. A polarizer filter can also help reduce glare from the glass.
The view from the Lotte World Tower offers a unique opportunity to capture architectural patterns and the sheer density of Seoul's development. Look for the distinct glow of major landmarks, the winding Han River, and the endless network of streets. This spot provides an exceptional chance for a different kind of Seoul night photography, focusing on urban geometry and the mesmerizing interplay of light and shadow from above. For a comprehensive overview of exploring the city, including tips on where to stay and other attractions, you might find our The Ultimate Seoul Travel Guide: Where to Stay & What to See helpful in planning your photographic adventure.
Lotte World Tower (Seoul Sky) Admission Fees and Operating Hours (2026):
- Operating Hours:
- Sunday – Thursday: 10:30 AM – 10:00 PM
- Friday – Saturday & Public Holidays: 10:30 AM – 11:00 PM
- Note: Last ticketing and entry is 1 hour before closing. It’s recommended to arrive about 30-60 minutes before sunset to capture both golden hour and the full transition to night.
- Admission Fees:
- General Ticket (Adults 13+): ₩31,000
- General Ticket (Children 3–12): ₩27,000
- Fast Pass (All ages): ₩62,000 (Immediate entry without waiting; only available on-site, perfect for those with limited time).
- Infants (Under 36 months): Free (Proof of age required)
- Tip: Visitors with a Seoul Sky ticket can receive up to 4 hours of free parking at Lotte World Mall. This can be a significant saving if you are driving.
Consider utilizing the "Sky Deck" with its glass bottom for truly adventurous shots, but be mindful of reflections here as well. A wide-angle lens will be your best friend for capturing the vastness, while a telephoto can help isolate interesting segments of the urban fabric below. Don't forget to look down – the intricate patterns of the city's streets and buildings directly below create compelling abstract compositions. Experiment with vertical panoramas to capture the immense height of the tower itself and the sprawling city beneath.
🌊 Riverside Magic: Banpo Hangang Park
For a dynamic and enchanting night photography experience, Banpo Hangang Park offers a captivating blend of urban reflections and a truly unique water feature: the Banpo Bridge Moonlight Rainbow Fountain. This location provides ample opportunities to capture the vibrant pulse of Seoul from a different perspective – at eye level with the glistening Han River.
The highlight for many photographers is undoubtedly the Banpo Bridge Fountain. This spectacular show sees water jets dance to music, illuminated by thousands of LED lights that create a dazzling rainbow effect. The fountain operates in seasons, and for 2026, the operating period is from March 16, 2026, to October 31, 2026. Each show lasts for 20 minutes.
Banpo Bridge Moonlight Rainbow Fountain Daily Show Times (2026):
- Off-Season (Mar–Jun, Sep–Oct): 12:00 PM (daytime), 7:30 PM, 8:00 PM, 8:30 PM, 9:00 PM
- Peak Season (Jul–Aug): 12:00 PM (daytime), 7:30 PM, 8:00 PM, 8:30 PM, 9:00 PM, 9:30 PM
It's crucial to note that shows may be suspended without prior notice due to strong winds (exceeding 7 m/s), heavy rain or flooding of the Hangang River, water quality issues, or energy-saving measures. Always check for official updates before heading out.
When photographing the fountain, long-exposure techniques are your best friend. A shutter speed of several seconds will transform the individual water jets into silky, ethereal streaks of light, enhancing the rainbow effect. A sturdy tripod is absolutely essential here. Experiment with different compositions, including the fountain as the main subject or using it as a vibrant backdrop for the city skyline across the river. The best viewing spots are the Moonlight Square or the Some Sevit floating islands.
Beyond the fountain, the park itself offers incredible photographic potential. Capture the glow of the Some Sevit (Floating Islands), which are beautifully illuminated at night, creating stunning reflections on the water. The surrounding bridges and the distant skyline provide excellent compositional elements. Consider bringing a remote shutter release to minimize camera shake during long exposures. Many visitors also enjoy picnicking by the river, and the vibrant atmosphere can add a lively foreground to your shots. For a deeper dive into enjoying Seoul's iconic riverside spaces after dark, including where to find the best fried chicken delivery to the park, check out our guide on Exploring Han River Parks at Night: Fried Chicken and City Lights.
To elevate your Banpo photography, look for opportunities to capture the reflections of the city lights and the fountain on the water's surface. A polarizing filter can help reduce glare and enhance these reflections. Experiment with different perspectives along the riverbank; the area near Sebitseom (Some Sevit) offers particularly striking views of the illuminated structures and the fountain with the cityscape in the background. Don't shy away from including people in your shots, especially during peak fountain times, as they can add a sense of scale and liveliness to the scene. Remember to also capture the details of the fountain's water patterns and color changes with varying shutter speeds.
🧱 The Historical Glow: Naksan Park & City Wall
For a more serene yet equally captivating night photography experience, Naksan Park, with its ancient Seoul City Wall, offers a poignant contrast between historical architecture and the modern urban sprawl. This less-crowded gem provides unique opportunities to capture the essence of old and new Seoul bathed in a soft, ethereal glow.
The magic of Naksan Park after dark lies in the interplay between the beautifully lit stone walls and the twinkling city lights spreading out below. As you ascend the park's paths, the illuminated segments of the city wall create natural leading lines, guiding the viewer's eye through your composition. The contrast of the rough, ancient stone against the sleek, modern skyline is incredibly photogenic, offering a rich narrative in every shot.
This spot is ideal for long-exposure photography, allowing you to capture the subtle movement of traffic lights below as streaks of color, and to enhance the gentle illumination of the wall itself. A wide-angle lens can help you capture the sweeping panorama of the city and the extensive length of the wall. Experiment with different viewpoints along the wall's path – each turn offers a new perspective on Seoul's diverse landscape. The quiet atmosphere of Naksan Park, especially compared to the bustling towers, allows for a more contemplative approach to your night shoot, perfect for capturing serene and timeless images. Consider arriving before sunset to capture the transition and the "golden hour" light as it bathes the ancient stone in warm hues, providing a beautiful contrast to the later blue hour and night shots.
While not as towering as Namsan or Lotte, Naksan Park offers a distinct Naksan Park night experience. It provides a unique blend of nature, history, and urban modernity, making it a favorite among local photographers looking for a less conventional perspective of Seoul. The park's relatively easy accessibility, combined with its stunning views, makes it an excellent choice for photographers seeking both iconic and subtly different compositions. Look for opportunities to frame the city lights through the ancient gates or archways of the city wall for an added historical touch.
📸 Essential Gear & Tips for Night Shoots
Mastering Seoul night photography requires not only knowing the best locations but also having the right equipment and techniques. Night shooting presents unique challenges, as low light conditions demand different approaches to exposure, stability, and focus. With a few essential tools and tips, however, you can overcome these hurdles to capture stunning images that truly do justice to Seoul's illuminated beauty.
Essential Gear Checklist
Before you head out, ensure your camera bag contains these crucial items:
- Camera Body: A DSLR or mirrorless camera with good low-light performance (larger sensors generally perform better).
- Lenses:
- Wide-angle lens (e.g., 14-24mm, 16-35mm): Ideal for capturing sweeping cityscapes, tall buildings, and expansive scenes. A fast aperture (f/2.8 or wider) is a bonus but not strictly necessary if you have a sturdy tripod.
- Standard zoom lens (e.g., 24-70mm): Versatile for general use and for isolating specific areas of the cityscape.
- Telephoto lens (e.g., 70-200mm): Useful for compressing perspective, isolating distant landmarks like N Seoul Tower, or capturing intricate details of the urban grid from a high vantage point.
- Sturdy Tripod: Absolutely non-negotiable for sharp night photos. It allows for long exposures without camera shake.
- Remote Shutter Release (or intervalometer): Prevents camera shake when pressing the shutter button for long exposures. A wired or wireless remote works, or you can use your camera's built-in 2-second timer.
- Extra Batteries: Long exposures drain battery life much faster. Always carry at least one fully charged spare.
- Headlamp or Flashlight: Essential for navigating in the dark, changing settings, and packing up gear. Choose one with a red light option to preserve your night vision.
- Microfiber Cloths: For cleaning lens smudges, especially if shooting near water or in humid conditions.
- Rain Cover (Optional but Recommended): Even a light drizzle can ruin your gear. A simple plastic bag can work in a pinch.
- Warm Clothing: Nights in Seoul, even in milder seasons, can get surprisingly chilly, especially when stationary for long periods. Layer up!
Stability: Tripod vs. Handheld
- Tripod (Highly Recommended): For virtually all night photography, a sturdy tripod is your best friend. It allows for long exposures (several seconds to minutes) necessary to gather enough light in low-light conditions, smooth out water, and create light trails from moving vehicles. Without a tripod, achieving sharp, noise-free images at night is extremely difficult. Look for a tripod that is stable, easy to set up, and can withstand light wind. Ensure all legs are fully extended and locked, and avoid extending the center column unless absolutely necessary, as it can reduce stability.
- Handheld (Limited Use): While possible in some situations, shooting handheld at night often results in blurry images due to camera shake and high ISO noise. If you must shoot handheld, push your ISO as high as your camera can tolerate without excessive noise, use the widest aperture available on your lens, and try to brace yourself against a stable surface. Image stabilization (IS) in your lens or camera body can help, but it's no substitute for a tripod for truly sharp nightscapes. Even with IS, keep your shutter speed at least 1/focal length (e.g., 1/50th for a 50mm lens) as a general rule of thumb, but in low light, this might still not be fast enough to prevent blur.
Best Camera Settings: Aperture, ISO, and Shutter Speed
Understanding the interplay of these three settings (the "exposure triangle") is crucial for successful night photography. Always shoot in RAW format for maximum flexibility in post-processing.
- Aperture (f-stop): Start with an aperture around f/8 to f/11. This provides a good depth of field, ensuring both foreground elements and the distant cityscape are in sharp focus. A narrower aperture (higher f-number) will also create a "starburst" or "sunburst" effect around bright light sources, which can be very appealing in night photos. For specific artistic effects or if you need more light, you might open up your aperture to f/4 or even f/2.8, but be mindful of shallower depth of field.
- ISO: Keep your ISO as low as possible, ideally ISO 100 or 200, to minimize digital noise. Since you'll be using a tripod for stability, you can afford longer shutter speeds, which allows you to keep the ISO low. Only increase ISO if absolutely necessary to get a usable exposure, and always be mindful of the noise it introduces. Modern cameras perform better at higher ISOs, but noise reduction in post-processing can only do so much.
- Shutter Speed: This is where the magic happens in night photography. With your camera on a tripod, you can use long shutter speeds. Start with exposures between 10 to 30 seconds as a baseline and experiment!
- For light trails from cars, longer exposures (20-30 seconds or more) work well.
- For still scenes with static lights and minimal movement, 10-15 seconds might be sufficient.
- If capturing water features like the Banpo Fountain, adjust shutter speed to create either silky smooth water (longer exposure) or more defined water droplets (shorter exposure, but still long enough to gather light).
- Always use a remote shutter release or the camera's self-timer (2-second delay) to avoid camera shake when pressing the shutter button.
- White Balance: While auto white balance can sometimes work, it often struggles with the mixed light sources of a city night. Experiment with presets like "Tungsten" (for cooler tones), "Fluorescent" (for warmer tones), or even a custom white balance if you have a gray card. Alternatively, shoot in RAW and adjust white balance in post-processing for maximum flexibility without compromising image data.
- Manual Focus: Autofocus can struggle significantly in low light, often "hunting" and failing to lock onto a subject. Switch your lens to manual focus (MF) and focus on a distant bright light or a well-lit part of your scene. Once focused, leave it on manual to prevent "focus hunting." You can also use "live view" mode and zoom in on a bright point of light to achieve precise focus.
General Tips for a Successful Night Shoot
- Scout Locations During the Day: Visit your chosen spots during daylight hours to familiarize yourself with the area, identify potential compositions, and plan your shots. This saves valuable time and frustration in the dark.
- Arrive Early (Blue Hour): The period just after sunset, known as "blue hour," is often the most beautiful for cityscapes. The sky still retains some color, providing a soft backdrop to the artificial lights of the city as they begin to glow. Aim to be set up and ready to shoot before the sun fully sets.
- Shoot in RAW: This is paramount for night photography. RAW files retain far more image data than JPEGs, giving you significantly more latitude for adjustments in post-processing, especially for recovering shadows and highlights and correcting white balance.
- Post-Processing is Key: Night photos often look a bit flat straight out of the camera. Use software like Adobe Lightroom, Photoshop, or other RAW editors to fine-tune exposure, contrast, white balance, sharpen details, and reduce noise. Graduated filters in post-processing can also help balance the brighter sky with the darker foreground.
- Safety First: When shooting at night, especially in less crowded areas, always be aware of your surroundings. Travel with a companion if possible, and let someone know your plans. Keep your gear secure.
- Experiment and Review: Don't be afraid to try different settings and compositions. Review your shots on your camera's LCD (zooming in to check focus) and make adjustments as needed. The best way to learn is by doing!
Conclusion
Seoul, with its dazzling array of lights and dynamic urban tapestry, offers an endless playground for night photographers. From the commanding heights of Namsan Tower view and the futuristic Lotte Tower observation deck to the rhythmic beauty of the Banpo Bridge Fountain and the historical charm of Naksan Park night, each location promises unique and captivating shots. By understanding the best vantage points, preparing with the right gear, and mastering your camera settings, you can immortalize the city's spectacular nocturnal beauty. Embrace the challenges and the serene atmosphere of shooting after dark, and you'll undoubtedly come away with a portfolio that truly shines. Remember to plan your visits, especially for timed events like the fountain shows, and always prioritize safety during your late-night photographic adventures. Happy shooting!