Shanghai Bund at Night: Camera Settings & Best Vantage Points

Shanghai can look overly polished in daytime photos, but at night the Bund becomes something more complicated and more rewarding: layers of colonial facades, river reflections, cruise lights, and the Lujiazui skyline all competing inside the same frame. The challenge is that the scene is bright enough to fool your camera and dark enough to punish lazy exposure settings.
If you want more than a snapshot, you need two things before you arrive: a clear idea of where to stand, and a camera approach that can handle extreme contrast. This guide walks through both, so you can leave with usable night shots instead of a camera roll full of blown highlights and black silhouettes.
Why the Bund at Night Is Worth Shooting
The Bund is one of the few places in Asia where a single viewpoint can hold a historic waterfront, a modern supertall skyline, river traffic, and strong architectural lines at the same time. That combination is why the area keeps showing up in travel photos, pre-wedding shoots, and city guides, but it is also why many first-time visitors come away disappointed. The lights are bright, the motion is constant, and the best composition often sits just a little farther away than people expect.
The easiest way to think about Bund night photography is this: you are not photographing “the Bund” as a single subject. You are photographing a relationship between three things. First, the row of historic buildings on the Puxi side. Second, the river itself, which works as a reflective foreground. Third, the Lujiazui towers, which create the counterweight and give the scene scale. When those three layers line up, the photo feels balanced. When one of them dominates, the picture feels flat.
The other reason the Bund is worth the effort is flexibility. You can photograph it with a phone, a compact camera, or a full-frame body and still come home with a strong image. The difference is not the gear. It is whether you understand where the light is coming from, how the river behaves after dusk, and which side of the river gives you the story you want to tell.
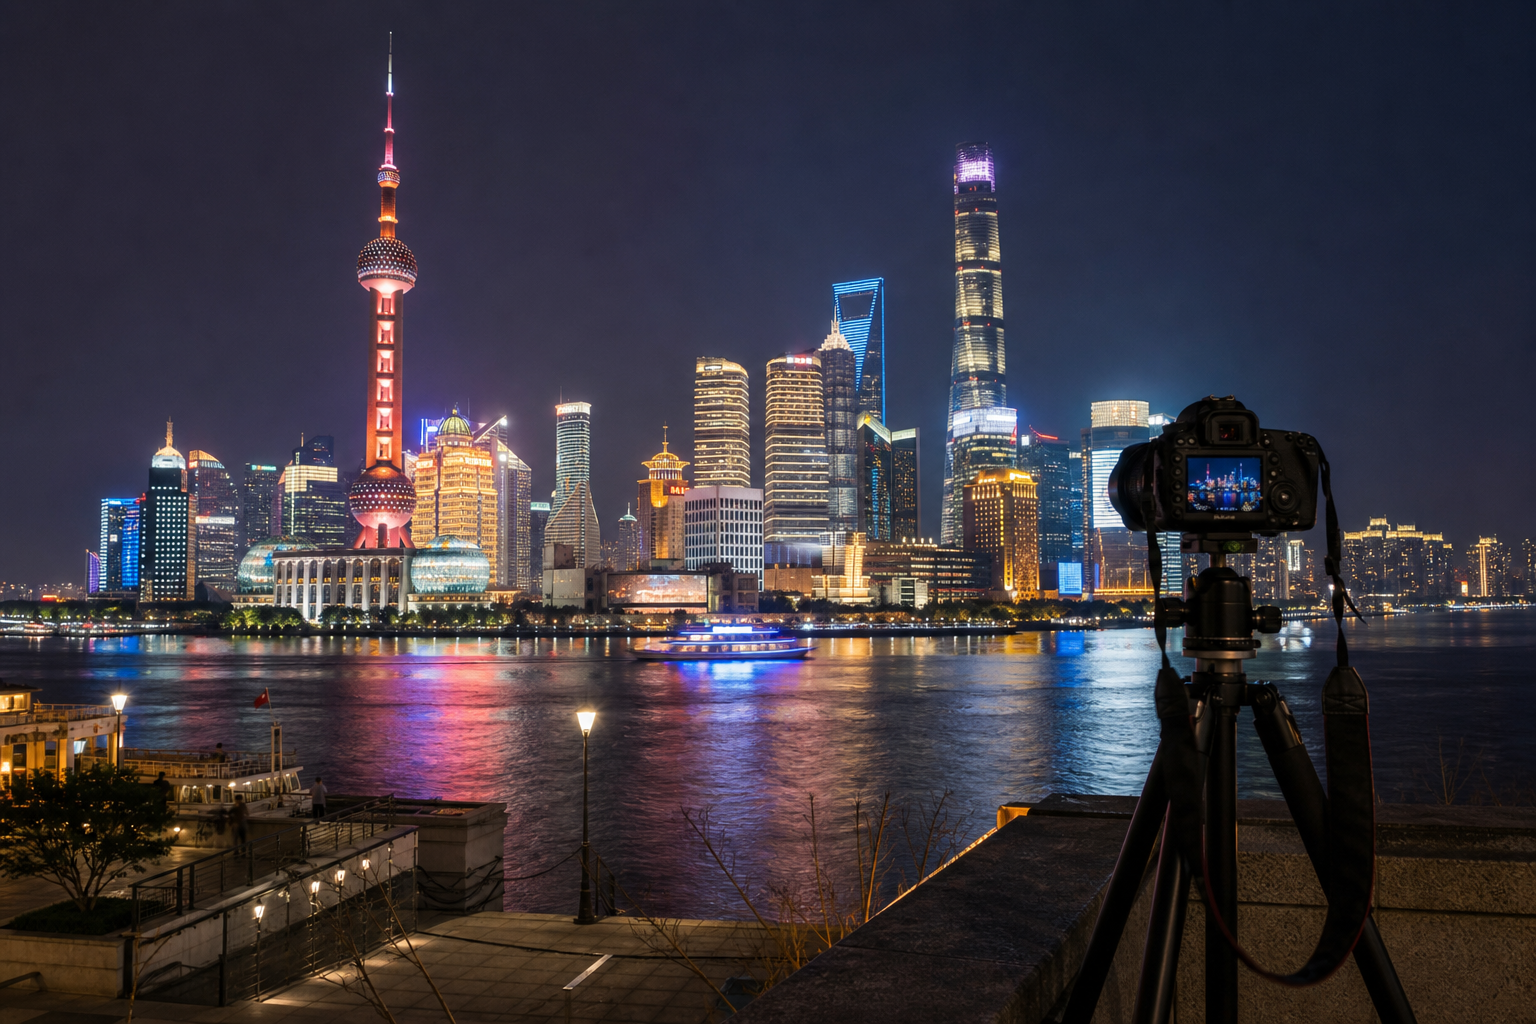
Best Vantage Points for the Bund at Night
The best Bund photos do not come from standing anywhere with a tripod. They come from choosing a viewpoint that matches the shot you want: classic postcard skyline, reflective river scene, wide city establishing frame, or close architectural detail. If you only have one evening, prioritize one spot on the Bund promenade and one spot across the river in Pudong.
1. The Classic Bund Promenade
If you want the definitive view of the Pudong skyline, the promenade along the Bund is the obvious starting point. This is where you get the historic facades on your side of the river and the lit towers across the Huangpu. It is also the most crowded option, which matters because crowd movement can either ruin a frame or help it if you want scale in the foreground.
The strongest compositions here usually come from shooting slightly away from the busiest cluster of onlookers. Do not plant yourself directly in front of everyone else’s favorite angle. Walk a little farther north or south, look for gaps in the railing line, and use the people as an anchor rather than an obstacle. A few silhouettes near the edge of the frame can make the scene feel alive.
2. Chen Yi Square and the Mid-Bund Stretch
The mid-Bund area around Chen Yi Square gives you a cleaner, more architectural perspective. This is a good place for a wider frame that includes more of the historic facades without losing the skyline across the water. The visual rhythm is calmer here, and the lights on the buildings are often more evenly distributed.
For photographers who like symmetry, this is one of the easiest places to control the frame. You can keep the river low in the composition, let the building fronts take up more of the lower third, and use the towers as a bright vertical counterpoint. It is also a good location if you want a less chaotic background for a portrait or a travel companion shot.
3. Waibaidu Bridge and the Suzhou Creek Mouth
Waibaidu Bridge is one of the best overlooked spots in the area because it gives you a different kind of Shanghai night scene. Instead of a pure skyline postcard, you get the bridge structure, the curve of Suzhou Creek, and the Bund edge fading into the distance. This is especially useful if you want variety rather than repeating the same famous riverfront angle.
The bridge area works well for long exposure because there is enough passing movement to create visual energy without forcing a tight crop. Boats, headlights, and occasional pedestrians can all add traces of motion. If the main Bund promenade is too busy, this can be your quieter backup location.
4. Across the River in Lujiazui
If your goal is to photograph the Bund itself rather than the towers, cross to the Pudong side. This is the move many visitors skip, but it often produces the best overall cityscape because you can capture the historic riverfront in full while the modern skyline sits behind it like a stage set.
The key advantage here is distance. When you are far enough away, the entire Bund frontage becomes legible as a line instead of a crowded strip of facades. The river widens in the frame, the reflections stretch out, and the image reads more clearly at a glance. For a first-night shoot, this may be the most forgiving spot on the list.
5. Elevated Views from Observation Decks
If you want a sweeping look at the city rather than a street-level composition, observation decks in the area can be useful. High viewpoints are better for establishing shots, river geometry, and showing how the Bund sits between the old city and the new. They are less useful for detail shots because you lose the texture of the facades and the sense of scale from street level.
Use elevated viewpoints as your opening or closing shot, not your main sequence. A high-angle photo of the Bund and the Huangpu can help orient your audience, but the most memorable images usually come from eye-level or slightly above eye-level at the waterfront.
6. Rooftop Bars and Hotel Terraces
Rooftop views work best when you want atmosphere and convenience. They are not the best choice for absolute sharpness or for very long exposures through glass, but they can save you from weather, crowds, or fatigue. If you plan to shoot from a rooftop, bring a microfiber cloth and expect to work around reflections.
This is the right option if your priority is a relaxed evening rather than a technical shoot. It is also useful for travelers who want one strong skyline image and then want to get back to dinner without spending half the night re-positioning for a better railing gap.
Camera Settings That Actually Work
The Bund is bright, but not evenly bright. That means the best settings depend on whether you are handheld, on a tripod, or shooting from a phone. The goal is not to find a magic number. The goal is to protect highlights, keep the river from turning into a black strip, and preserve enough detail in the facade lights to make the image feel intentional.
1. Handheld Blue-Hour Settings
The best handheld time is the 20 to 40 minutes after sunset, when the sky still carries some color and the city lights are already on. This window is easier than full darkness because the sky itself acts like a soft light source.
Use a starting point like:
- Aperture:
f/2.8tof/5.6 - Shutter speed:
1/60to1/125 - ISO:
400to1600 - White balance: around
3800Kto4500K
If your lens is not especially fast, open the aperture a bit wider and let the ISO rise rather than letting the shutter drop so low that every tiny movement ruins the frame. The city is steady enough that you can tolerate a little grain. Motion blur from your hands is harder to fix than a slightly noisy file.
2. Tripod Long-Exposure Settings
Once the sky goes darker and the reflections become more important, a tripod helps a lot. The Bund after full dark is a long-exposure scene. Boats move through the frame, people blur into streaks, and the river softens into a mirror if the wind is light.
Use this as a baseline:
- Aperture:
f/8tof/11 - Shutter speed:
2to8 seconds - ISO:
100to200 - White balance:
3500Kto4200K
If the water is calm and you want slightly smoother traffic trails, try 10 to 15 seconds. If the scene starts to lose detail in the moving lights, shorten the exposure and accept a little more texture. The right shutter speed depends on what part of the frame you want to feel still versus alive.
Do not forget the practical tripod basics. Turn off image stabilization when the camera is locked down. Use a two-second timer or remote release. If your tripod is light, hang your bag from the center column or choose a lower, more stable stance. The Bund promenade can vibrate a little under foot traffic, so the sturdiest setup is not always the tallest one.
3. Phone Camera Settings
Phones can do very well here if you keep the workflow simple. Start with the native night mode, but do not let the phone make every decision. If your device offers manual exposure compensation, dial it down slightly so the white building lights do not clip into bright blobs.
Good phone habits include:
- Tap to focus on the skyline before shooting
- Pull exposure down a little if the highlights look too hot
- Hold the phone steady against the railing if needed
- Shoot several frames, not just one
On newer phones, the biggest mistake is over-trusting computational smoothing. Night mode can be useful, but if the exposure gets too aggressive, the city can look smeared and synthetic. A cleaner, slightly darker frame is usually easier to salvage than one that tries to brighten everything equally.
4. Mirrorless or DSLR Baseline Settings
If you are using a larger camera, a good starting workflow is manual exposure with raw capture. That lets you control the balance between the river reflections and the facade lights instead of letting the meter chase the brightest sign in the frame.
A reliable baseline:
- Mode: Manual
- File type: RAW
- Aperture:
f/8 - ISO:
100 - Shutter: adjust until highlights are protected
- Focus: manual, near infinity, then fine-tune
From there, bracket a few frames. One slightly darker frame can protect the skyline lights, while another can lift the river and foreground detail. When you edit later, the Bund often rewards a conservative exposure because the building lights and the sky glow can fall apart if you push too hard.
5. White Balance and Color
Shanghai night scenes often swing between warm building lights, cool sky tones, and neon accents from traffic or signage. Auto white balance can work, but it tends to drift from frame to frame, which makes a series feel inconsistent. If you want a cleaner set, choose a fixed Kelvin value and keep it constant while you shoot a whole segment.
Around 3800K to 4300K is a safe starting range for the Bund. Lower values preserve the blue tone of the evening sky and make the river feel cooler. Higher values warm up the facades and make the scene feel more inviting. Neither is universally right. Pick the tone that matches the mood you want: crisp and urban, or warm and cinematic.
Practical Guide
The Bund promenade itself is free to access and effectively open at all hours, which is part of why it works so well for both sunrise and night photography. There is no admission fee for walking the riverfront. In practical terms, the best time to shoot is from about 30 minutes before sunset until roughly 90 minutes after blue hour, when you still have a little color in the sky and the city lights have fully come alive.
If you want the simplest possible plan, arrive before dusk, scout two or three angles, and wait for the sky to darken rather than trying to shoot the second you step out of the taxi. The Bund gets better in stages. First the facades glow. Then the towers across the river switch the scene from documentary to cinematic. Then the reflections settle in and the whole place starts to feel layered.
Hours, Admission, and Prices
- Bund promenade: free
- Access: open all day and night
- Best shooting window: sunset through late evening
- Observation decks and rooftops: ticketed or consumption-based, with prices and hours varying by venue
- River cruises: separate paid tickets, often more expensive during peak evening departures
For observation decks or rooftop bars, check current same-day hours before you go. Some venues sell out evening slots around sunset, especially on weekends or clear-weather holidays. If you want a specific time window on a high viewpoint, book in advance rather than trying to walk in after dinner.
How to Get There
The most straightforward access point is the East Nanjing Road area. From there, you can walk toward the riverfront and join the promenade. If you are coming from elsewhere in central Shanghai, the metro is usually the easiest choice because it avoids traffic and drops you close enough to walk the final stretch.
For first-time visitors, the practical approach is simple:
- Take the metro to East Nanjing Road or a nearby central station.
- Walk toward the riverside until you hit the promenade.
- Scout your composition before you open the camera app.
- Stay long enough for the sky to go fully dark.
If you plan to shoot from the Pudong side, build in extra walking time. It is worth it because the opposite-bank perspective often gives you the widest and cleanest frame, but it does require a bit more transit and a little more patience.
Booking and Optional Add-Ons
You do not need tickets to photograph the Bund itself, which is one reason it is such a good first-night stop in Shanghai. If you want a different angle, however, a paid high viewpoint can be useful. Observation decks, rooftop restaurants, and river cruises all create distinct compositions, and each one is better for a different kind of shot.
If your trip is short, prioritize the free waterfront first and treat the paid viewpoints as optional extras. If your schedule is looser, pair the Bund with a river cruise or a rooftop stop and use that higher perspective for a second photo set. For broader Shanghai planning, the Shanghai Travel Guide: The Bund, French Concession & Hidden Gems will help you decide how to sequence the rest of your stay.
Tips and Common Mistakes
The biggest Bund photography mistake is starting too late. If you arrive after the city is already fully dark, you lose the subtle color in the sky and the transition that makes the scene feel dimensional. The second biggest mistake is assuming that the brightest view is automatically the best one. The most photogenic frame is usually the one with the most balanced foreground, not the one with the most light.
Do Not Chase the Center of the Crowd
People tend to cluster where the view is most obvious. That is usually the worst place to shoot because everyone’s phones, arms, and tripod legs end up in the same line. If the main cluster is dense, move twenty or thirty meters away. A slightly less famous angle often gives you a cleaner horizon and better foreground control.
Protect the Highlights
Night city photos fail when the lights are overexposed. Once a bright facade or neon sign is clipped, the detail is gone. Expose for the brightest part of the scene that matters, not for the darkest corner of the river. The Bund looks better a little darker than it does when the towers are washed out.
Watch for Reflections on Glass
If you are shooting from a rooftop or through a window, reflections will appear faster than you think. Press the lens close to the glass if the setting allows it, shade the lens with your hand or a jacket, and avoid having bright interior lights behind you. Even small reflections can ruin an otherwise strong shot.
Keep One Lens or Focal Length in Reserve
Travel photographers often over-complicate a night shoot by changing lenses too often. Pick one working focal range and stay with it long enough to understand the scene. A wider lens is useful for the riverfront and bridges. A moderate telephoto is useful for compressing the skyline and isolating details. Both are valid. The mistake is switching back and forth so often that you lose the light.
Check the Weather Before You Go
Clear, slightly hazy nights can be excellent for the Bund because the skyline lights bloom gently and the river reflections remain visible. Heavy rain is less useful unless you specifically want wet pavement and reflection-heavy compositions from covered areas. Wind matters too, because a rippling river reduces mirror-like reflections and makes long exposures feel busier.
Keep Your Trip Safe and Simple
The Bund is heavily visited and generally easy to navigate, but crowded riverfronts are still crowded riverfronts. Keep your bag closed, know your exit point, and avoid standing with your back to moving pedestrian traffic for too long. If you are using a tripod, set it up where you are not blocking the flow of people who are simply trying to pass through.
Combine the Bund With a Wider Shanghai Plan
The Bund works best as part of a broader Shanghai evening rather than as a random standalone stop. You can pair the waterfront with dinner in the city center, a walk through the old streets, or a second viewpoint in Pudong. If you are still deciding how the Bund fits into the rest of the trip, the China Travel Planning: Visa, WeChat Pay, High-Speed Rail & Practical Guide is a better companion than a generic photo checklist because it helps you solve the logistics that shape the whole evening.
FAQ
What time is best for photographing the Bund at night?
The most reliable window is from sunset through the first hour of full darkness. If you want color in the sky, arrive before sunset and stay through blue hour. If you want the strongest contrast between river, facades, and skyline lights, stay a little later.
Is the Bund free to visit?
Yes. The promenade is free to enter, which is why it is such a practical photography stop. You only pay if you choose optional extras such as a river cruise, observation deck, rooftop bar, or special experience.
What camera settings should I start with?
For handheld shooting, start around f/2.8 to f/5.6, 1/60 to 1/125, and ISO 400 to 1600. For tripod shooting, start around f/8, ISO 100, and a shutter between 2 and 8 seconds. Adjust from there based on how bright the skyline looks.
Can I get good Bund photos with a phone?
Yes. A modern phone can produce very usable night images if you keep the exposure under control and stay steady. Use night mode carefully, keep an eye on highlight clipping, and shoot several frames so you have options later.
Is it better to shoot from the Bund or from Pudong?
Both. Shoot from the Bund if you want the classic view of Lujiazui across the river. Shoot from Pudong if you want a cleaner, wider image of the Bund itself. If you only have one night, try both angles so you leave with a more complete set.
Conclusion
The Bund is one of those rare places where a little planning makes a dramatic difference. If you pick the right side of the river, arrive before blue hour ends, and expose for the lights instead of the darkness, the scene does most of the work for you. The historic facades, river reflections, and skyline all play different roles, and the best photos happen when you give each of them enough room to breathe.
If you are building a Shanghai itinerary around one memorable evening, use the Bund as the anchor, then add a second viewpoint only if it genuinely improves the story you want to tell. For more photo-focused inspiration, the Best Photography Spots in China: Ancient Towns to Modern Skylines can help you think beyond one city skyline.