Korean Food Photography Tips: How to Shoot and Share Your Culinary Journey

Travelers often arrive in Korea with a camera ready and a table full of color in front of them, then freeze at the exact moment the food hits the table. The dish is already getting cold, the server is waiting, and the image in your head does not quite match the scene in front of you. This guide is for that moment. It shows you how to photograph Korean food quickly, respectfully, and in a way that makes the experience better instead of turning dinner into a production.
You do not need expensive gear to do this well. You need a small set of habits: noticing light before you order, choosing an angle that flatters the dish, learning how to tell a story with side dishes and table details, and sharing the final image in a way that feels authentic. Korean food is especially rewarding to photograph because it brings together contrast, repetition, texture, steam, glossy sauces, bright vegetables, and a strong sense of place. If you learn a few rules, almost every meal becomes easier to shoot.
This article focuses on practical field advice for travelers. It covers what makes Korean food look good on camera, how to handle common restaurant situations, where food photography gets easier, how to turn a meal into a shareable story, and what mistakes make even a beautiful table look flat in a photo. If you want a broader trip-planning frame while building your food route, the The Ultimate 10-Day South Korea Itinerary for First-Timers can help you map meals into your days, while the Korean Cooking Classes: Where to Learn to Cook Like a Local guide is useful if you want to photograph food you helped make yourself. For café-based dessert and drink shots, the 10 Most Instagrammable Cafes in Seoul (2026 Edition) is a practical companion.
What Makes Korean Food So Photogenic
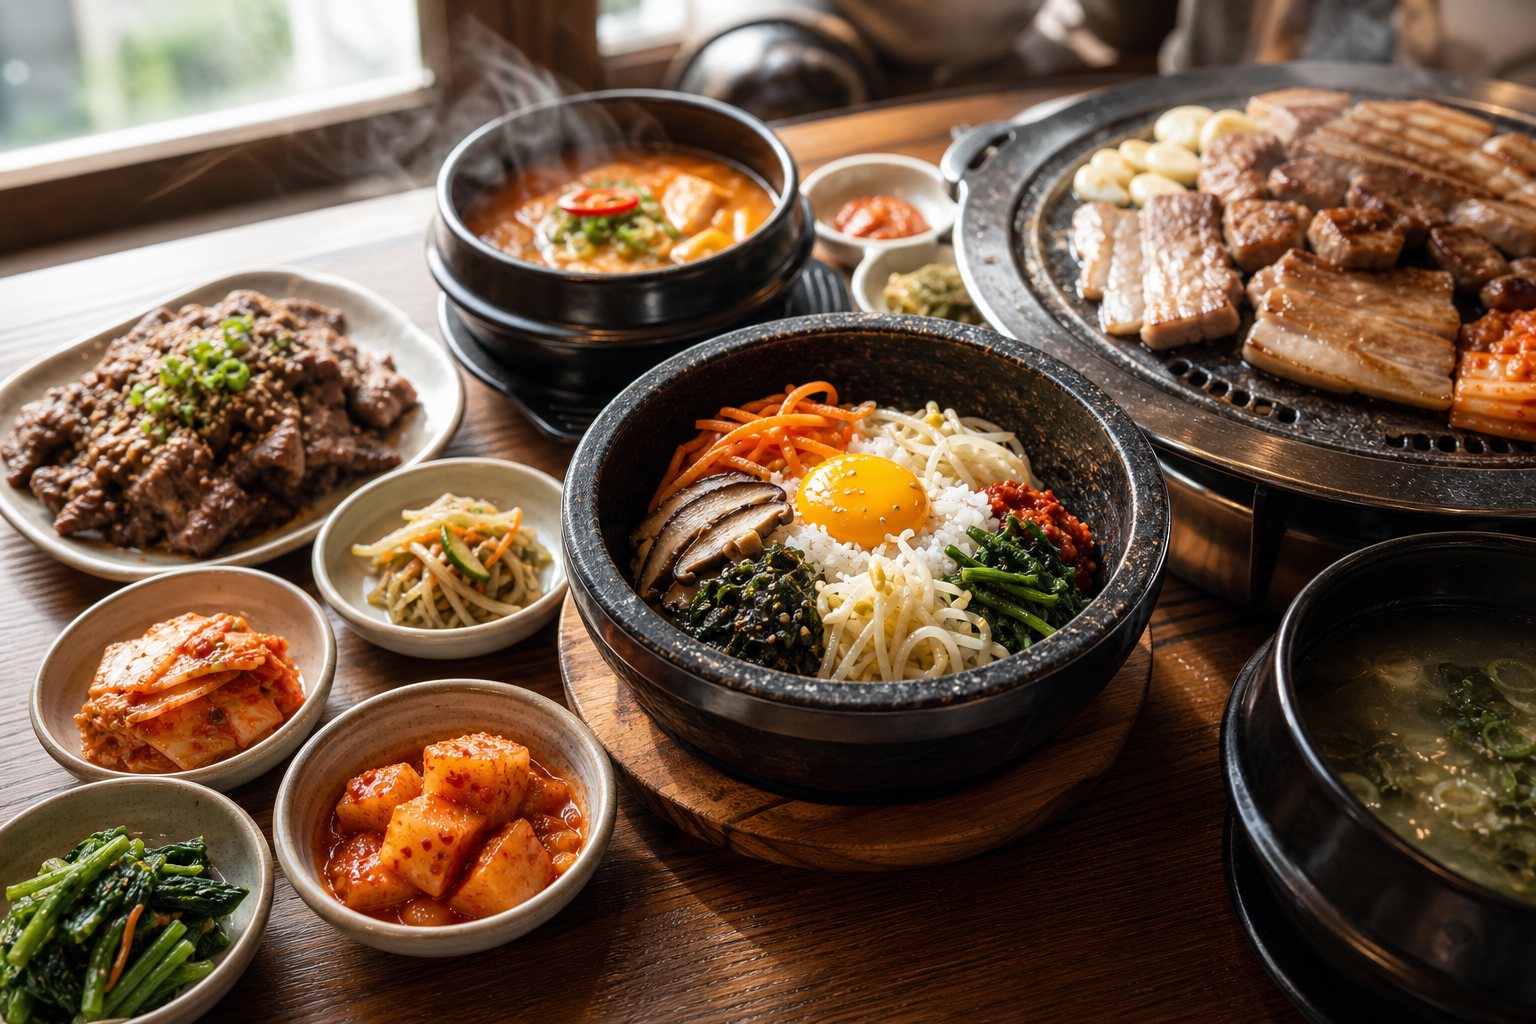
Korean food photographs well because it naturally combines color, texture, and structure: white rice beside dark soy glaze, bright kimchi against metal or ceramic bowls, stacked banchan, sizzling grills, bubbling stews, and garnishes that add movement. The best photos usually keep one strong subject in focus, preserve the sense of abundance, and show enough context to make the meal feel real.
If you only remember one thing, remember this: Korean food usually looks best when you photograph the table as a whole first, then move in for detail shots of the most distinctive item. A wide shot captures the rhythm of banchan and shared plates; a tighter shot captures steam, shine, and texture. Together, they tell the story of the meal rather than just documenting a dish.
Why the table matters as much as the dish
Many visitors try to isolate the “hero” food and ignore everything around it. That works for a burger or a single dessert, but Korean dining is often built around context. A bowl of soup on its own can look plain, while that same bowl framed by chopsticks, a spoon, small dishes, and a pot lid suddenly feels lived-in and appetizing. The table is part of the composition.
That is especially true for shared meals. Korean barbecue, jjigae, naengmyeon, fried chicken, and set menus are social foods. The photo should communicate that energy. Leave a little room in the frame for utensils, shared tongs, or an extra plate. Those details make the image feel less staged and more like a scene you were actually part of.
Color contrast is your biggest advantage
Korean food often gives you contrast for free. Red chili paste, green scallions, pale noodles, black seaweed, white rice, golden fried batter, and glossy brown sauces can all sit in one frame. Use that to your advantage by choosing an angle that separates bright and dark elements instead of letting them blend into a single patch of color.
If the dish is visually intense, keep the background simple. If the dish is minimal, use the rest of the table to add texture and interest. A good photo usually has one thing that pops, one thing that anchors the frame, and one thing that gives the eye a place to rest.
Steam, shine, and movement are the secret ingredients
Some foods become less interesting after a minute or two on the table; others become more interesting. Kimchi stew, grilled meats, hot stone rice, noodle soups, and pancakes all benefit from a little visible energy. Steam makes a photo feel alive. Glossy sauce makes the food look fresh. A chopstick lifting noodles or a spoon breaking the surface of a stew can add motion without feeling artificial.
The trick is to capture that energy before the dish sits too long. Set your camera settings in advance, take your first frame quickly, and then make small adjustments. A restaurant meal should still be a meal. You are aiming for efficiency, not perfectionism.
How to Shoot Korean Food Well
The easiest way to improve your food photography is to stop thinking only about the camera and start thinking about the plate, the table, and the light as a single scene. Korean restaurants often have mixed lighting, reflective surfaces, and crowded tables, so the same photo can look excellent or awkward depending on where you place yourself.
Start with the light, not the camera
Natural light is still the easiest light to work with, especially near a window or during daytime café visits. If you are in a restaurant with bright overhead lighting, look for a seat near the edge of the dining room, not directly under a harsh bulb. Even a small shift in position can soften shadows and reduce glare on soup, sauces, and metal bowls.
If the light is weak, do not automatically raise your ISO to the highest possible setting. Move the dish closer to the best light first. Then stabilize your phone or camera with both hands, use a steady surface, and take several shots. A slightly underexposed image with clean detail is usually easier to edit than a noisy image that looks bright but muddy.
Choose your angle based on the shape of the dish
Not every Korean dish should be shot the same way. A top-down view works well for a crowded table, a spread of banchan, or a flat arrangement of pancakes, rolls, and side dishes. A slightly angled shot works better for bowls, stews, stacked meats, layered desserts, or anything with height. A close side angle can be powerful for noodles, soups, or layered textures when you want to emphasize depth.
The best angle is the one that shows the dish’s strongest characteristic. Ask yourself what the dish is “about.” Is it color? Height? Steam? Crunch? Runny yolk? Layering? Pick the angle that supports that idea, not the one you use by default.
Use one dominant subject per frame
The biggest mistake travelers make is trying to include too much at once. A table full of dishes is exciting in real life, but a photo with no clear subject can feel cluttered. When possible, let one item dominate the frame and let the supporting dishes sit around it as context.
That does not mean the other dishes should disappear. It means the viewer should know immediately where to look first. If the subject is grilled pork, make the grill or platter the anchor and let the lettuce, sauces, and side dishes support the story. If the subject is bibimbap, let the color and bowl shape lead, then use chopsticks or a spoon to give scale.
Pay attention to reflective surfaces
Korean restaurants often use shiny metal bowls, lacquered tables, or glossy plates. These surfaces can look clean and modern, but they can also reflect ceilings, lights, and your own hand. Before you shoot, tilt the dish slightly, shift your body, or change your angle until the reflections stop fighting the food.
This matters even more when you photograph soup or broth. A bright reflection on the surface can erase detail. A small change in perspective can reveal the ingredients, the steam, and the depth of the bowl.
Shoot the first version fast, then improve
Food changes quickly. Noodles soften, steam fades, and sauces spread. Your first shot should be the safe shot: clear, well framed, and focused. Only after you have captured that image should you experiment with close-ups, chopstick lifts, or alternate angles.
That workflow keeps you from missing the moment. It also makes sharing easier later because you already have one usable image before you start creating more artistic frames.
Share the Meal as a Story, Not Just a Post
The strongest travel food content usually tells the viewer where you were, what you ordered, and why the meal mattered. The image matters, but the caption and sequence matter too. When you think like a storyteller, your food photos become more memorable and more useful to other travelers.
Build a mini narrative around the meal
A simple food story has three parts: where you ate, what stood out, and what the meal felt like. You do not need to overexplain. A short caption can still be specific enough to be useful. For example, a traveler might say they tried cold noodles after a hot afternoon, or that a late-night barbecue meal became the best surprise of the trip.
Those details matter because they help the viewer understand the context. They also make your post easier to revisit later. A photo of noodles means more when you remember that it was your first dinner after landing, or the meal that ended a long day of walking.
Include supporting details in the frame
The supporting details are what make the food feel local rather than generic. A tissue box, a water cup, chopsticks, a metal tray, shared tongs, the corner of a menu, or the label on a sauce bottle can all help. You do not need to stage them carefully. In fact, the best supporting details often come from simply leaving the table as it is.
Try to include the dining environment too. A booth, a street-side counter, a market stall, or a minimalist café each tells the viewer something different about the experience. The same dish will feel completely different depending on the space around it.
Keep the editing style consistent
Travel feeds look more polished when the photos share the same mood. You do not need a strict preset, but you should avoid wildly changing color temperature from one meal to the next. If one image is warm and soft, the next image should not suddenly turn cold and blue unless you want that contrast for a reason.
For Korean food, a gentle edit usually works best. Keep the rice looking white, the greens looking fresh, and the reds looking rich but not neon. Over-saturated chili paste or over-bright highlights can make the food feel artificial. The goal is appetizing realism.
Think about sequence, not only the hero shot
One photograph can be good, but a short sequence can be better. For a single meal, you might post a wide table shot, a close-up of the main dish, one action shot, and a final image that shows the atmosphere. That gives your audience both the visual payoff and the context.
This approach is especially helpful on social platforms where viewers scroll quickly. If the first image gets attention but the next images explain the meal, you are much more likely to hold their interest long enough for them to read your caption or save the post.
Practical Guide
Food photography in Korea becomes easier when you plan the day the way a local eater would, not just the way a tourist would. That means thinking about timing, booking, seating, and how much energy you want to spend moving between meals and photo stops. If you are building a day around a class, a café, or a multi-stop food route, treat it like part of the itinerary rather than an afterthought.
Hours, admission, and prices
For restaurants, cafés, and markets, the practical issue is often not admission but timing. Lunch hours can be crowded, dinner hours can be loud, and late-night spots can give you dramatic lighting but less control over where you sit. If you want clean photos, aim for the first seating of the day at a café, or arrive a little before peak meal time at a restaurant so you can settle in before the room gets busy.
For cooking classes, prices and session length vary by provider, but the planning logic is similar: book early enough to choose a class time with good light, and check whether the class includes a market visit, tasting session, or plated finale. A class that ends with a finished dish gives you the most photo opportunities because you can capture ingredients, process, and result in one experience.
If you want a practical place to start, the Korean Cooking Classes guide is the best companion for choosing a class that fits your schedule and style. Cooking classes are especially useful when you want controlled light, a clean prep area, and a structured story for your content.
How to get there
The easiest food photos come from places that do not exhaust you before you sit down. In Seoul, that usually means choosing neighborhoods with dense transit access and short walking distances between stops. If you are planning a food-heavy day, cluster your meals and cafés in one area rather than crossing the city between each stop.
That is where trip planning helps. A well-structured route reduces the chance that your food arrives after you are already tired or rushed. If you are still assembling the bigger travel plan, the South Korea itinerary guide can help you think about when to place food experiences inside the wider trip, rather than treating them as random add-ons.
For cafés and dessert stops, try to book or arrive early enough to choose a seat near a window or an open wall. In a busy city café, the best photo seat can be gone quickly. The same rule applies to markets: the earlier you arrive, the easier it is to photograph food before the crowd thickens.
Booking links and reservations
Reservations are not always necessary for casual meals, but they can make a big difference for experiences you want to document carefully. A booked cooking class, a popular barbecue restaurant, or a themed café with limited seating is easier to photograph when you are not worried about waiting in line or missing your slot.
When a booking platform is available, use it for convenience rather than novelty. The value is in reducing friction. You want the process to be simple enough that you can focus on the meal, the table setup, and the light instead of the logistics.
For a lighter, photo-first stop, the Seoul cafe guide is useful because cafés often give you the easiest combination of natural light, tidy plating, and time to set up a shot without pressure. That makes them excellent practice spaces for travelers who want to improve before photographing more chaotic meals.
What to carry in your bag
You do not need a full kit, but a few small items help:
- A phone or camera with decent low-light performance
- A microfiber cloth for wiping fingerprints from the lens
- A small power bank so you do not rush your shots
- A compact tripod if you plan to shoot indoors for a long time
- A pair of chopsticks or a spoon you are comfortable using in action shots
The most important item is not technical gear. It is patience. If you know what kind of image you want before the food arrives, you can work faster and with less disruption to the meal.
Tips & Common Mistakes
The difference between an average food photo and a strong one is often not the camera. It is restraint. Travelers who improve quickly usually make fewer but better decisions: they simplify the frame, manage the light, and stop trying to make every dish look like a magazine cover.
Do not over-stage the table
A little styling helps; too much styling makes the meal feel fake. If you move every side dish, fold every napkin, and rearrange every utensil, the photo may look neat but lose its sense of place. Korean food is at its best when it still feels like a real table.
Let the restaurant do some of the work. The natural arrangement of banchan, sauce dishes, and shared plates usually looks more authentic than a heavily manipulated setup.
Do not ignore the first few seconds after serving
The most appealing version of many dishes exists immediately after they arrive. Steam is strongest, sauces are freshest, and garnish sits in the intended position. If you spend too long adjusting your camera, you may miss the most photogenic moment.
Take one safe shot first. Then refine if you have time. This rule saves many meals from becoming a photo project that never produces a usable image.
Do not shoot every dish from the same angle
Repetition makes your feed boring even when the food is excellent. If every dish is shot from directly above, the viewer stops noticing the differences between meals. Vary the perspective depending on the dish and the table.
Use top-down for spreads, angled shots for bowls, and close action shots for noodle lifts, sauces, or grilled meat. Variation keeps the story moving.
Do not let the background compete with the food
Busy wallpaper, bright packaging, and random clutter can distract from the dish. Before you shoot, glance at the edges of the frame. A cleaner background makes the food easier to read. If the background is messy, move your plate slightly or tighten the composition.
The same principle applies to editing. If the image already contains strong colors, keep post-processing light. Too much contrast can turn beautiful food into something harsh and unnatural.
Do not forget people
Some of the best travel food photos include hands, conversation, or a partial portrait rather than a perfect still life. A meal is rarely just a plate. It is often a moment with a friend, a guide, a chef, or a stranger who recommended the dish.
If appropriate, include a human element. A hand reaching for a piece of fried chicken, a person pouring tea, or a friend lifting noodles can make the scene feel warmer and more memorable.
Do not treat every meal like content first
If you are constantly optimizing for social media, you can end up missing the actual experience. The point of food photography is not to replace the meal. It is to preserve it. Keep the process light, move quickly, and then put the device down long enough to enjoy what you ordered.
When the balance is right, the photo becomes a souvenir rather than a distraction.
FAQ
What is the easiest Korean dish to photograph for beginners?
Bibimbap is a good starting point because it naturally combines multiple colors in one bowl. Kimbap, tteokbokki, grilled meat, and café desserts are also beginner-friendly because they have clear shapes and strong visual contrast. The easiest dish is usually the one that already has a clear color story.
Is a phone enough for Korean food photography?
Yes. A modern phone is enough for most travel food photography. Good timing, good light, and a clear angle matter more than advanced camera settings. If your phone lets you adjust exposure manually and tap to focus, you already have the main tools you need.
How do I photograph food in a dark restaurant?
Move closer to the best available light, stabilize the phone or camera, and avoid zooming digitally. If the restaurant is very dark, look for a seat near a window or a brighter wall. For soups and grills, capture the first serving quickly before the lighting changes your dish’s appearance.
Should I photograph every dish before eating?
No. Photograph the dishes that matter most to your story, and keep the process short. If the meal is casual, one or two strong images may be enough. If the meal is a highlight of the trip, take more shots, but still try to keep the dining experience relaxed.
How can I make my food posts feel more personal?
Add one sentence about why the meal mattered. Mention the neighborhood, the weather, the first bite, the person you ate with, or the reason you chose the dish. Small details turn a generic food post into a travel memory.
Conclusion
Korean food photography works best when it stays close to the experience. You do not need a studio setup or a complicated editing process. You need to notice light, choose the right angle, capture the meal before it changes, and tell a story that includes the table, the atmosphere, and the reason the meal mattered.
If you keep the process simple, your photos will improve quickly. Start with one clean shot of the whole table, one close image of the main dish, and one action frame that shows steam, movement, or a shared moment. Then use the caption to explain what made the meal worth remembering. Over time, your feed will stop looking like a collection of random plates and start reading like a real culinary journey.
The most useful next step is to build one food-focused day into your trip, choose a place with good light, and practice on a meal you already want to enjoy. That way the photography supports the travel instead of competing with it.